- VSCode as a PowerShell Editor
- Switching from ISE to VSCode
- Configuring VSCode
- Shoud you drop ISE forever ?
VSCode as a PowerShell Editor
With the recent release of PowerShell Core v6.0, it has been officialised that Visual Studio Code is the new recommended PowerShell Editor. Of course, you can still use PowerShell ISE to make your scripts, but VSCode comes with some really interesting features that you definitely want to use.
Switching from ISE to VSCode
You may have been using ISE for a while and switching to VSCode is not really in your priorities. Here are some features to reconsider the question.
- Live debugging : You can use Stop points and variable assignment more easily. While debugging, you can use step-to-step forwarding to enter a module function for instance.
- Better snippets : You can create your own snippets and call them in a more elegant manner than
CTRL+J. More over, you can handle multiple placeholders and default values. - Integrated Source Control : You can have your git or svn connected to VSCode and manage those within it.
Configuring VSCode
Let’s give some credit to Mike F. Robbins tutorial which I used when trying to set up VSCode a while ago.
For the next part, I am assuming that you are on a Windows Environment.
Installating VSCode
- Go to https://code.visualstudio.com/ and download the lastest stable build.
-
Lauch the installer and leave everything default. Be sure to select these:
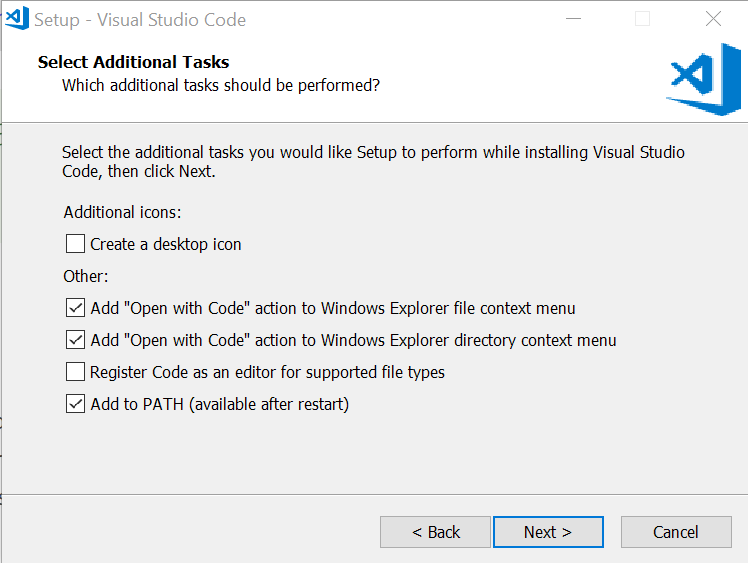
It will allow you to Right Click a file and open it with VSCode. I suggest not to register VSCode as default editor of compatible files though, it might be annoying.
- VSCode is now installed.
PowerShell Setup
- First of all, you have to download the PowerShell extension.
- Go the the extension tab `CTRL + SHIFT + X’
- Search for PowerShell and click
InstallthenReload - The PowerShell extension is now installed. VSCode integrates a PowerShell console also.
- Similarly, you can add icons to make it more friendly
- Search for VS-Icons extension and install it.
- Update your user settings preference. It could also be Workspace settings or Folder settings
-
Hit
F1and search for settings
-
Add (or Update) the following settings
{
  "workbench.iconTheme": "vscode-icons",
  "files.defaultLanguage": "powershell",
  "editor.formatOnType": true,
  "editor.formatOnPaste": true,
  "powershell.integratedConsole.focusConsoleOnExecute": false,
  "window.zoomLevel": 0,
  "editor.mouseWheelZoom": true
}
Thanks to these settings, you will have nice icons and the
New Fileis set as .ps1
-
Working with snippets
-
Use existing snippets
The PowerShell extension provides many snippets. The snippets become available as soon as your are working on a PowerShell file.
Just type the snippet name and press tab.
You can find the existing snippet by pressing
F1and search for Insert Snippet. You will have a list of the available snippets, corresponding to the language of the active file. -
Create custom snippets
You can also add your own custom snippets. First, press
F1and search for snippet then Open User Snippets then PowerShell. You will enter the powershell.json file, which provides an example on how to create a snippet.There is a tool that I like, even if it is not perfect : https://pawelgrzybek.com/snippet-generator/
It doesn’t handle every aspect of PowerShell language, like escaping $ character, but it gives a good start to create your snippet. Just paste your PowerShell code and complete the Description and Prefix.
I like to use&before my prefix because it won’t collide with existing snippets and I can get all my snippets by writing&thenCTRL + Space. Of course, this is a matter of personal taste.
You can also useCTRL + Ion snippet generator website to add placeholders, which will allow you to tab from on placeholder to another. (See gif below)Then paste it to your powershell.json file. Make sure to put a comma
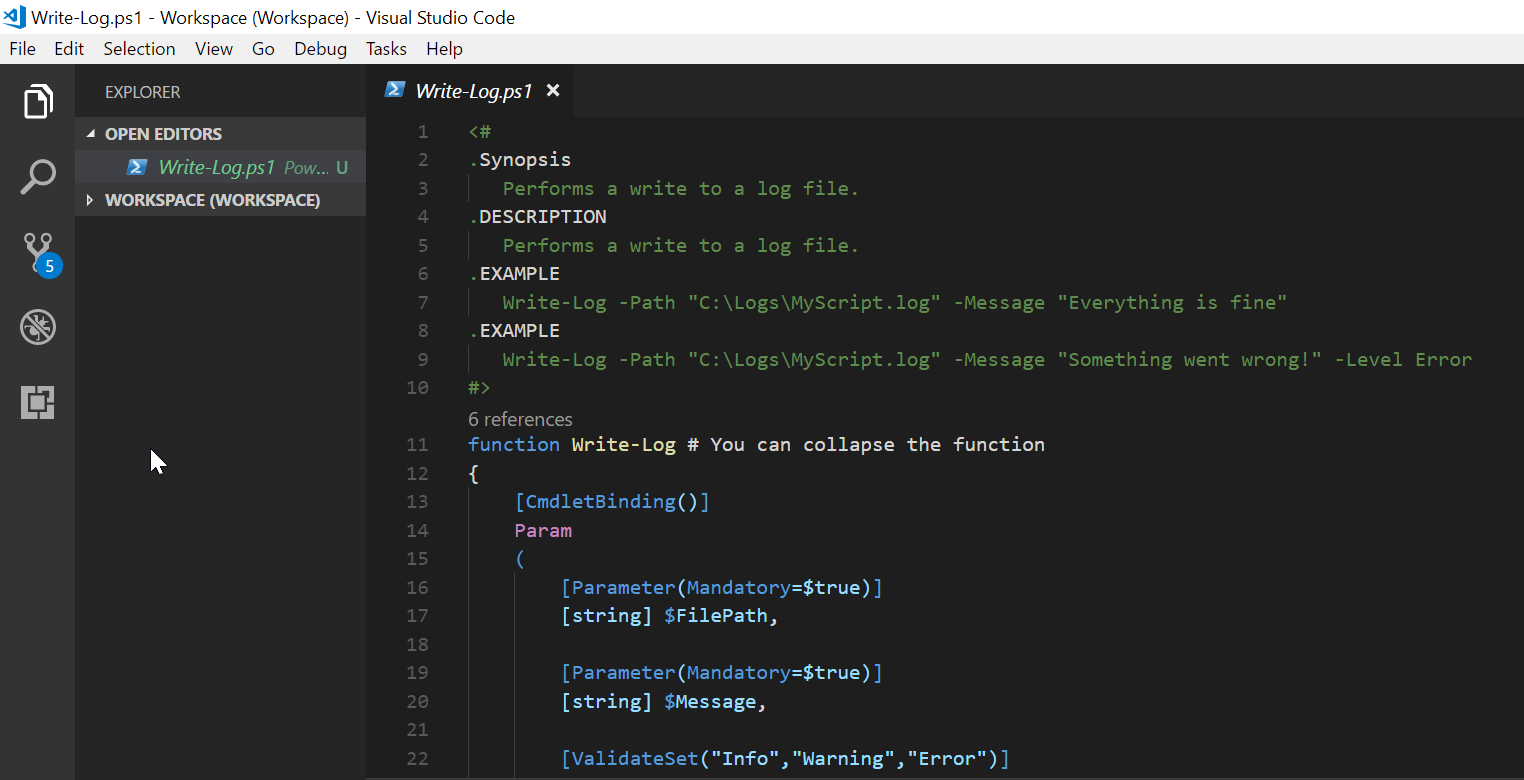
,between each snippet. For PowerShell, you will need to replace “$” by “\\$”. Most of the time, it doesn’t require more tweaking.Here is a snippet I made to get the process output, based on an example found on StackOverFlow.
  "Creates a process with output": {
  "prefix": "&processOutput",
  "body": [
      "\\$ProcessInfo = New-Object System.Diagnostics.ProcessStartInfo",
      "\\$ProcessInfo.FileName = \"${1:ping.exe}\"",
      "\\$ProcessInfo.RedirectStandardError = \\$true",
      "\\$ProcessInfo.RedirectStandardOutput = \\$true",
      "\\$ProcessInfo.UseShellExecute = \\$false",
      "\\$ProcessInfo.Arguments = \"${2:localhost}\"",
      "\\$Process = New-Object System.Diagnostics.Process",
      "\\$Process.StartInfo = \\$pinfo",
      "\\$Process.Start() | Out-Null",
      "\\$Process.WaitForExit()",
      "\\$StdOut = \\$Process.StandardOutput.ReadToEnd()",
      "\\$StrErr = \\$Process.StandardError.ReadToEnd()",
      "",
      "# Exit Code",
      "\\$Process.ExitCode"
  ],
  "description": "Creates a process with output"
  }
And here is the result :
Shoud you drop ISE forever ?
I would say no, or rather not yet. I don’t know if it is a matter of habit, but I often use PowerShell ISE when I want to try a short piece of code. Also, depending on your habits, you may need to tweak a lot VSCode at first to find your keyboard shortcuts back for instance.
But on the long run, let’s be honest, PowerShell ISE will be abandonned and VSCode will be more and more PowerShell friendly and updated. It is the official editor of PowerShell Core and as a good PowerShell scripter, I think it’s time to switch.